This Epson Stylus Pro 7890, 7908, 9890, 9908, 7700, 7710, 7900, 7910, 9700, 9710, 9900, 9910, WT7900, WT7910, PXH10000, PXH8000 printers Full Service Manual, Parts List, Block Wiring Diagram and Exploded Views - 4 in 1 describes basic functions, theory of electrical and mechanical operations, maintenance and repair procedures of the printer.
 Security policy
Read our Privacy policy
 Payment methods
Debit/Credit cards, BTC/ETH/LTC/USDT
 Return policy
Read our return policy
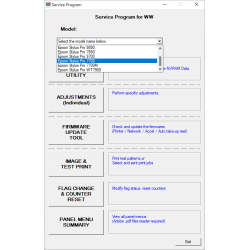
For making printer adjustments and maintenance You can use Epson Pro 7700, 7890, 7900, 9700, 9890, 9900 Service Adjustment Program
Chapter 1 PRODUCT DESCRIPTION
1.1 Product Description
1.2 Basic Specifications
1.2.1 Basic Specifications
1.2.2 Electric Specifications
1.2.3 Ink Specifications
1.2.4 General Specifications
1.2.5 Reliability/Durability
1.2.6 Auto Take-up Reel Unit
1.3 Printing Specifications
1.3.1 Paper Feed Specifications
1.3.2 Paper Specification
1.3.3 Printable Area
1.3.4 Borderless Printing Specification
1.3.5 Cutting of Roll Paper
1.4 Hardware Specifications
1.4.1 Dimensions and Weight
1.4.2 Part Names
1.4.3 Option Correspondence Table
1.5 Control Panel
1.5.1 Menu Mode Settings
1.5.2 Maintenance Mode
1.5.3 Serviceman Mode
2.1 Main Body
2.1.1 Housing
2.1.2 Electric Circuit Components
2.1.3 Carriage Mechanism
2.1.4 APG Mechanism
2.1.5 Paper Feed Mechanism
2.1.6 Ink System
Chapter 2 OPERATING PRINCIPLES
2.2 Options
2.2.1 Auto Take-up Reel
2.2.2 SpectroProofer
Chapter 3 TROUBLE SHOOTING
3.1 Overview
3.1.1 Preliminary Check
3.1.2 Troubleshooting Procedure
3.2 List of Error Messages
3.3 Remedies for Error Messages
3.4 Remedies for Error Messages related to SpectroProofer/Auto Take-up Reel
3.5 Remedies for Maintenance Requests
3.6 Remedies for Service Call Error
3.7 Remedies for Print Quality Troubles
3.7.1 Remedies for Print Quality Troubles
3.7.2 Remedies for Print Quality Troubles when Using Epson Stylus Pro WT7900/
WT7910
Chapter 4 DISASSEMBLY & ASSEMBLY
4.1 Overview
4.1.1 Precautions
4.1.2 Orientation Definition
4.1.3 Recommended Tools
4.1.4 Cautions when replacing the Main Board Assy/Power Supply Board Assy ..
170
4.1.5 Differences of the parts/components between models
4.2 Parts Diagram
4.3 Disassembly Flowchart
4.4 Disassembly and Assembly Procedure
4.4.1 Special operation for servicing
4.4.2 Housing
4.4.3 Electric Circuit Components
4.4.4 Carriage Mechanism
4.4.5 Paper Feed Mechanism
4.4.6 Ink System Mechanism
4.4.7 Auto Take-up Reel
4.4.8 SpectroProofer
Chapter 5 ADJUSTMENT
5.1 Overview
5.1.1 Precautions
5.1.2 Adjustment Items and the Order by Repaired Part
5.1.3 Description of Adjustments
5.1.4 Tools for Adjustments
5.1.5 Service Program Basic Operations
5.2 NV-RAM BACKUP UTILITY
5.3 CR Related Adjustment
5.3.1 CR Timing Belt Tension Adjustment
5.3.2 CR Encoder Sensor Adjustment
5.3.3 Head PG Adjustment
5.3.4 Cleaning PG Adjustment
5.4 Head Related Adjustments
5.4.1 Head Rank ID
5.4.2 Head Cleaning
5.4.3 Nozzle Check
5.4.4 Printhead Slant Adjustment (CR)
5.4.5 Printhead Slant Adjustment (PF)
5.4.6 Auto Uni-D Adjustment
5.4.7 Auto Bi-D Adjustment
5.4.8 Colorimetric Calibration (Color ID)
with SpectroProofer
5.4.9 Absorber Position Check
5.4.10 Ink Mark Sensor Height Adjustment
5.4.11 Ink Mark Sensor Adjustment
5.4.12 Air Leak Check for Ink Supply System
5.4.13 Initial Ink Charge Flag ON/OFF
5.4.14 Initial Ink Charge
5.5 PF Related Adjustment
5.5.1 PF Timing Belt Tension Adjustment
5.5.2 Skew Check
5.5.3 Band Feed
5.5.4 T&B&S Adjustment
5.5.5 Paper Thickness Sensor Position Adjustment
5.5.6 PF Encoder Sensor Adjustment
5.5.7 Rear Sensor AD Adjustment
5.6 AID Related Adjustment
5.6.1 AID Function check
5.7 Other Adjustment
5.7.1 Setting Destination
5.7.2 Input CR/PF Motor Current
5.7.3 RTC and USB ID
5.7.4 Installing Firmware
5.7.5 Input Serial Number
5.7.6 Input MAC Address
5.7.7 Cut Position Adjustment
5.7.8 Ink Holder Adjustment
5.8 Clear Counters
5.9 Tests
5.9.1 Network Communication Check
5.9.2 Suction Fan Operation Check
5.9.3 Color LCD Display Check
5.9.4 Button Operation Check
5.9.5 Inspection of the SpectroProofer
5.10 Check Adjustments Results
Chapter 6 MAINTENANCE
6.1 Overview
6.2 Setting Up/Storing the Printer
6.2.1 Setting Up
6.2.2 Storing the Printer and Cleaning the Ink Path
6.3 Transportation
6.4 Cleaning
6.5 Lubrication
Chapter 7 Epson Stylus Pro 7700M/7710M (Copy Mode)
7.1 Overview
7.2 Basic Specifications
7.2.1 Scanning Specifications
7.3 Printing Specifications
7.4 Copy Mode
Chapter 8 APPENDIX
8.1 Block Wiring Diagram
8.1.1 Main Body
8.1.2 Auto Take-up Reel
8.1.3 SpectroProofer
8.2 Panel Menu Map
8.2.1 Epson Stylus Pro 7900/7910/9900/9910/7890/7908/9890/9908
8.2.2 Epson Stylus Pro 7700/7710/7700M/7710M/9700/9710
8.2.3 Epson Stylus Pro WT7900/WT7910
8.2.4 Epson Stylus Pro 7700M/7710M (Copy Mode)
8.3 Part names used in this manual
8.4 Parts List
8.5 Exploded Diagram
Data sheet
This Epson Stylus Pro 7890, 7908, 9890, 9908, 7700, 7710, 7900, 7910, 9700, 9710, 9900, 9910, WT7900, WT7910, PXH10000, PXH8000 printers Full Service Manual, Parts List, Block Wiring Diagram and Exploded Views - 4 in 1 describes basic functions, theory of electrical and mechanical operations, maintenance and repair procedures of the printer.